If this document does not correspond to your current software version, you can go to Download Center to find other available document versions.

QNAP

QuTS hero 5.0.x

Download (PDF)

LAN Switching Configuration

LAN switching enables users to resolve bandwidth issues by increasing the efficiency of LANs using VLAN and port trunking technologies.

Configuring VLAN Settings

A virtual LAN (VLAN) groups multiple network devices together and limits the broadcast domain. Members of a VLAN are isolated and network traffic is only sent between the group members. You can use VLANs to increase security and flexibility while also decreasing network latency and load.

Important:

When using both port trunking and a VLAN, port trunking must be configured first.

  1. Go to Control Panel > Network & File Services > Network & Virtual Switch.

    The Network & Virtual Switch window opens.

  2. Go to Network > Interfaces.
  3. Identify the adapter that you want to configure, then click .
  4. Select Add VLAN.

    The Add VLAN window opens.

  5. Specify a VLAN ID.
    Important:

    The VLAN ID must be between 1 and 4094.

  6. Specify a description for the VLAN.
  7. Select one of the following options.

    Option

    Steps

    Automatically obtain the IP address using DHCP

    Select Obtain IP address settings automatically via DHCP.

    Use a static IP address

    1. Select Use static IP address

    2. Specify a fixed IP address.

    3. Select a subnet mask.

    4. Specify the default gateway.

  8. Click Apply.

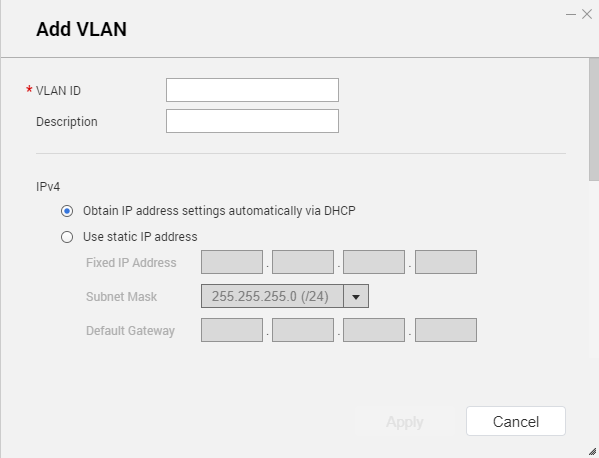
Network & Virtual Switch adds the VLAN.

Configuring Port Trunking Settings

Port trunking combines two or more Ethernet interfaces for increased bandwidth, load balancing and fault tolerance (failover). Load balancing is a feature that distributes workloads evenly across multiple Ethernet interfaces for higher redundancy. Failover ensures that a network connection remains available even if a port fails.

Important:

Before configuring port trunking settings, ensure at least two network interfaces are connected to the same switch.

  1. Go to Control Panel > Network & File Services > Network & Virtual Switch.

    The Network & Virtual Switch window opens.

  2. Go to Network > Interfaces.
  3. Click Port Trunking.

    The Port Trunking window opens.

  4. Click Add.

    The Port Trunking (Add) window opens.

  5. Select two or more network interfaces to add to the trunking group.
  6. Click Next.
  7. Select a switch type.
  8. Click Next.
  9. Select a trunking mode.
    Important:

    Some port trunking modes must be supported by your network switches. Selecting an unsupported mode may affect network performance or cause the network interface to freeze.

    Mode

    Description

    Fault Tolerance (Failover)

    Active-Backup

    All traffic is sent and received using the interface that was first added to the trunking group. If this primary interface becomes unavailable, the secondary interface will become active.

    Broadcast

    Transmits the same network packets to all the network interface cards.

    Load balancing & Failover

    Balance-tlb

    Incoming traffic is received by the current interface. If the interface fails, a secondary interface takes over the MAC address of the failed interface. Outgoing traffic is distributed based on the current load for each interface relative to the interface's maximum speed.

    Balance-alb

    Similar to Balance-tlb, but offers additional load balancing for incoming IPv4 traffic.

    Balance-rr

    Transmits network packets sequentially to each network interface card in order to distribute the internet traffic among all the NICs.

    Balance-xor

    Transmits network packets using the Hash algorithm, which selects the same NIC slave for each destination MAC address.

    802.3ad dynamic

    Uses a complex algorithm to aggregate NICs and configure speed and duplex settings.

  10. Click Apply.

Network & Virtual Switch applies the pork trunking settings.