|
myQNAPcloud Service |

|

|
|
|
|
myQNAPcloud Service |

|

|
|
myQNAPcloud Service
|
myQNAPcloud Service |
|
|
|
|
|
myQNAPcloud Service |
|
|
|
myQNAPcloud provides host name registration, mapping of a dynamic NAS IP to a domain name, and auto port mapping for UPnP routers on the local network. Use the myQNAPcloud wizard to register a unique host name for the NAS, configure automatic port forwarding on the UPnP router, and publish NAS services for remote access over the Internet.
To use the myQNAPcloud service, make sure the NAS has been connected to an UPnP router and the Internet and click the myQNAPcloud shortcut from the NAS Desktop or Main Menu.
This chapter includes two parts. The first part deals with the myQNAPcloud App you use on the NAS and covers the following setup:
The second part of the chapter focuses on the following topic:
| • | myQNAPcloud Portal (a portal for remote accessing and managing multiple NAS across the Internet.) |
It is recommended to use the wizard the first time you use myQNAPcloud. Follow these steps:
| 1. | Click "Get Started" to use the wizard. |
| 2. | Click "Start". |
| 3. | Fill out your myQNAPcloud ID(QID) and password. Click "Next" (or click "Create myQNAPcloud account" to sign up a myQNAPcloud account if you don’t already have an account.) |
| 4. | Enter a name to register your NAS and click "Next". |
| 5. | Select to enable the myQNAPcloud services (Auto Router Configuration, DDNS, Publish Services and CloudLink) and set the level of access control. Click "Next". |
| 6. | The wizard will configure your router automatically. |
| 7. | Review the summary page and click "Finish" to complete the wizard. |
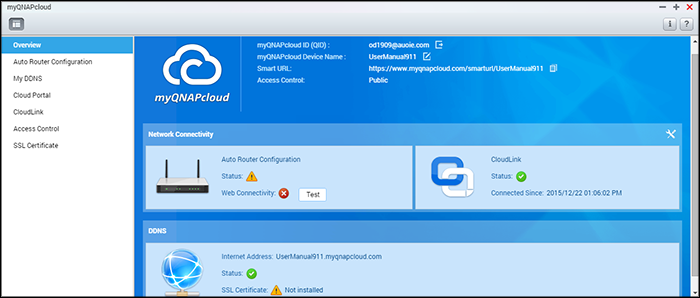
In "Auto Router Configuration", you can enable/disable UPnP port forwarding. When enabled, your NAS is accessible from the Internet via the UPnP router.
Note: If there is more than one router on the network, only the one which is set as the default gateway of the NAS will be detected. |
If no UPnP router is found on the local network, click "Rescan" and "Diagnostics" to check the diagnostic logs. If the UPnP router is incompatible with the NAS, click the tooltip icon (!) and then click "UPnP Router Compatibility Feedback..." (http://www.qnap.com/go/compatibility_router.html) to contact technical support. Select the NAS services to be allowed for remote access and click "Apply to Router". The NAS will automatically configure the port forwarding on the UPnP router. You will then be able to access NAS services from the Internet.
Note:
|
By enabling the myQNAPcloud DDNS service, you can connect to the network services on your NAS by using your specified internet address. To change your myQNAPcloud DDNS domain name, click the "here" link on the page. Your recent DDNS information will be shown here and you can click the "Update" button to refresh the result.
With the Cloud Portal, web-based NAS services (including File Station, Web Server, Photo Station, Music Station, Secure File Station, Secure Web Server, Secure Photo Station and Secure Music Station) can be published to http://www.myqnapcloud.com. By enabling the NAS services here, they will be opened for remote access even if they are not published. Enable the myQNAPcloud DDNS service and the NAS will automatically notify the myQNAPcloud server if the WAN IP address of the NAS has changed. To use the myQNAPcloud service, make sure the NAS has been connected to a UPnP router and the Internet.
Note:
|
| 1. | In "Cloud Portal", web-based NAS services are shown. Select "Publish" to publish the NAS services to the myQNAPcloud website. Select "Private" to hide published NAS services from public access. The private services on the myQNAPcloud website are only visible to specified users with the myQNAPcloud access code. If a disabled NAS service is published, the service will be inaccessible even if the corresponding icon is shown on the myQNAPcloud website (http://www.myQNAPcloud.com.) |
| 2. | Set myQNAPcloud Access Code: Enter a 6-16 characters (a-z, A-Z, 0-9 only) code that NAS users will need to enter when they attempt to view private NAS services on the myQNAPcloud website. |
| 3. | Click "Add Users" and specify up to 9 local NAS users who are allowed to view private NAS services published on the myQNAPcloud website. |
| 4. | Select the connection method: the myQNAPcloud Connect (VPN) utility and/or myQNAPcloud website. |
| 5. | To send instructions to use the myQNAPcloud service to users via email, select the users and click "Send Invitation". |
| 6. | Enter the email address. Click "Send". |
Note: To use this function, the email server settings must be properly configured in "System Settings" > "Notification" > "SMTP Server". |
CloudLink is an innovative service provided by QNAP for remote access to your NAS over the network without changing router settings - even if UPnP is not supported. After you enable the service (click the switch on the blue banner to enable/disable the service) the direct access link will be shown on the page and you can provide this link to your friends for them to access to your NAS, using their mobile device or computer.
This function allows you to control who can search for your device and access published NAS services on the myQNAPcloud website or with mobile apps remotely via CloudLink. The following options are available:
| • | Public: Everyone can search for your device on the myQNAPcloud website and access your public services. |
| • | Private: Only you can access your NAS remotely on the myQNAPcloud website or with mobile apps via CloudLink. |
| • | Customized: You can specify who is allowed to access your device on the myQNAPcloud website or with mobile apps by entering their registered accounts here. Or you can add email addresses of your friends who are not currently myQNAPcloud members to send them an invitation. To set access controls, first set the "Device access controls" to "Customized", then click "Add" to add QID account holders. |
myQNAPcloud SSL certificates are used to provide secured connections between the NAS and web browsers, providing authorization and connection encryption. Encrypted connections secure data and transactions. Before installing a myQNAPcloud certificate, an error may occur when you try to connect to your NAS using HTTPS (for example: https://nossl.myqnapcloud.com.) The data transmitted in the connection is not protected against security threats. Unauthorized users have the potential to intercept data being sent between a NAS and web browser.
Purchasing and installing a myQNAPcloud SSL certificate will bring you better protection when connecting your NAS via DDNS.
Note: A myQNAPcloud SSL certificate can only be used on NAS with QTS 4.2 or above. |
Purchasing myQNAPcloud SSL certificates
| 1. | Sign into the myQNAPcloud website with your myQNAPcloud account and go to "SSL Certificate" on the left side. |
| 2. | Read and agree to the terms and conditions. |
| 3. | Choose the number of certificates you want to buy (only one certificate can be used on one device at a time) and complete the purchase and checkout process. |
| 4. | Confirm the order and return to the "SSL Certificate" page on the myQNAPcloud website. |
Installing myQNAPcloud SSL certificates
| 1. | Log into your NAS as an administrator and launch myQNAPcloud. |
| 2. | Select "SSL Certificate" on the left panel > click "Download and install" to install the certificate. |
| 3. | Choose one of your purchased certificates from the list > click "Confirm". |
To install the same certificate on another device, log into the NAS as an administrator, go to myQNAPcloud > "SSL Certificate" and click "Release" to release the certificate. Then, follow the same above steps to install that released myQNAPcloud SSL certificate on another device.
On the myQNAPcloud portal site, you can review the transaction history in "SSL Certificate" > "Transaction record". There are three transaction types:
| • | Apply: The certificate has been installed. |
| • | Release: The certificate has been released from the device. |
| • | Reissue: The certificated has been reissued due to a DDNS name change. |
| • | Extend: The certificate’s validity has been extended. |
The system will remind you of the expiration date within 30 days of expiration. Please renew your certificate before it expires. To extend your certificate, log into the myQNAPcloud website and go to "SSL Certificate" > "Certificate License".
Note:
|
The myQNAPcloud portal (www.myqnapcloud.com) is an integrated web interface that allows you to:
| • | Manage and configure your myQNAPcloud account |
| • | Access NAS servers |
| • | Use published services from other NAS |
| • | Open links shared with you |
| • | Be notified of myQNAPcloud activities |
You must configure your myQNAPcloud account using the myQNAPcloud App before logging into the myQNAPcloud portal.
Managing and Configuring your myQNAPcloud Account
After launching myQNAPcloud or logging into your account on the myQNAPcloud website, click on your nickname (next to the notification icon in the top-right corner) > "User Profile". On this page, you can:
| • | Update your profile |
| • | Change your myQNAPcloud login password |
| • | Add or edit your contact list |
| • | Check application logs |
| • | Monitor myQNAPcloud activities |
Accessing NAS Servers via myQNAPcloud Website
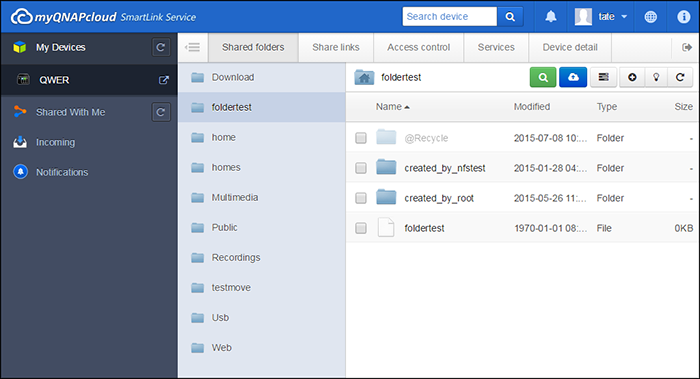
After you log into the myQNAPcloud web portal, you will see a list of NAS servers under "My Devices" on the left of the screen. Click on any of the NAS and there will be a list of available actions to perform and you will be able to:
| • | Perform basic file management tasks as in File Station |
| • | Manage share links |
| • | Configure access controls (check the above Access Control section for more details) |
| • | View and access published and private services (for private services, check the above Cloud Portal section for more details) |
| • | Review and refresh device details or unregister the device |
Note:
|
Using published Services from other NAS Servers via myQNAPcloud Website
The "Shared with me" feature allows you to quickly find your friend’s devices and access their published NAS services. Follow these steps to add a device and access its published services:
| 1. | Log into the myQNAPcloud web portal |
| 2. | Type the device name of your friend’s device in the search box in top right corner. |
| 3. | Click the "Add to Shared With Me" button (the gray heart icon) |
| 4. | Click "Shared With Me" to the left of the screen. |
| 5. | Click the newly added device from the list and the service you want to access. |
| 6. | Choose an access method. |
Sharing Files and Opening Links Shared with You via myQNAPcloud Website
If you share data to your friends who have registered on myQNAPcloud, they will see these shared links here.
To share a file on the myQNAPcloud portal site, follow these steps:
| 1. | Log into the site |
| 2. | Select a device under "My Devices" on the left panel |
| 3. | Log into your device |
| 4. | Choose the folders or files you want to share |
| 5. | Click "Share" and fill out the required fields for the link (link name, domain name/IP, expiration, and password protection) > "Next" > and finish link recipient and email details > "Share". |
To open a such link, first log into the myQNAPcloud website and click "Incoming" to the left of the screen and you will see the links you can click to access them.
Note: Before you use this feature, you must install the CloudLink QPKG in the App Center. |
Be notified for myQNAPcloud activities
The portal will notify you of myQNAPcloud activities. Examples of such activities are:
| • | Your friends have added your device as a favorite |
| • | Your friends have created a shared link for you. |
| • | Your friends have shared their device with you. |
To check myQNAPcloud activities, follow these steps:
| 1. | Log into the myQNAPcloud portal site |
| 2. | Click "Notifications" on the left of the screen (or the notification icon next to the device search box.) |
|
© 2017 QNAP Systems, Inc. |
|