|
External Backup |

|

|
|
|
|
External Backup |

|

|
|
External Backup
|
External Backup |
|
|
|
|
|
External Backup |
|
|
|
The following topics are covered in this chapter:
The NAS supports real-time and scheduled data backup between internal disks volumes on the NAS and external USB/eSATA storage devices.
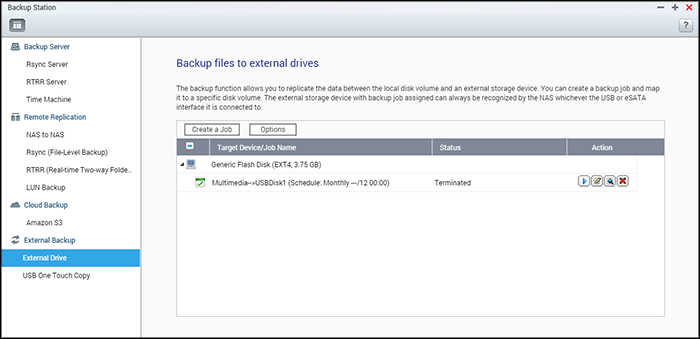
To use this feature, follow these steps.
Note: If an external storage device is encrypted by the NAS, make sure it is unlocked in "External Device" > "External Storage" before creating any backup jobs. |
| 1. | Connect one or more storage devices to the USB or eSATA (if available) interfaces of the NAS. |
| 2. | Click "Create a new job". |
| 3. | When the wizard is shown, read the instructions carefully and click "Next". |
| 4. | Select the backup locations. |
| a. | Select an external disk volume from the drop-down menu. The NAS supports EXT3, EXT4, FAT, NTFS, and HFS+. The storage device's general information will be shown. |
| b. | Select "Map this backup job to the volume ID only" to map the backup job to this particular external storage device. The NAS will recognize the device and automatically execute the backup job according to the settings every time it is connected to the NAS via any USB/eSATA interface. |
| c. | Select to back up the data from a local disk volume to the external storage or vice versa. |
| d. | Click "Next". |
| 5. | Select the source and destination folders for backup. Then click "Add". Up to 128 folder pairs can be created. Click "Next". |
Note:
|
| 6. | Choose between real-time and scheduled backup. Real-time backup copies files that are new, changed, and renamed from the source folder to the target folder as soon as the changes are made after the first-time backup. Scheduled backup copies files from the source folder to the target folder according to the schedule. The options are: |
| o | Replicate Now: Copy the data immediately. |
| o | Periodically: Enter the time interval in hours and minutes that the backup job should be executed. The minimum time interval is 5 minutes. |
| o | Hourly: Specify the minute when an hourly backup should be executed (for example, enter "01" to execute backup on the first minute of every hour). |
| o | Daily: Specify the time when a daily backup should be executed (for example: 02:02 every day). |
| o | Weekly: Select a day of the week and the time when a weekly backup should be executed. |
| o | Monthly: Select a day of the month and the time when a monthly backup should be executed. |
| o | Auto-Backup: Execute data backup automatically every time the device is connected and detected by the NAS. |
| 7. | Choose to automatically eject the external drive after the job is finished. |
| 8. | To configure the backup policy and filter settings, select "Configure policy and filter" and click "Next". Select whether or not to enable the following options: |
| o | Delete extra files: Deletes extra files in the target folder. Deletions made on the source folder will be repeated on the target folder. This option is not available for real-time data backup. |
| o | Detect sparse files: Select this option to ignore files with null data. |
| o | Overwrite the file if the source file is newer or the file size is different. |
| o | Check file contents: Examine the file contents, date, size, and name to determine if two files are identical. This option is not available for real-time data backup. |
| o | Ignore symbolic links: Select this option to ignore symbolic links in the pair folder. |
| 9. | Create filters for the backup job. |
| o | File size: Specify the minimum and maximum sizes of the files to be copied. |
| o | File date/time: Specify the date and time of the files to be copied. |
| o | Include file types: Specify the file types to be copied. |
| o | Exclude file types: Specify the file types to be excluded from the data copy. |
| 10. | Enter a name for the backup job. A job name supports up to 63 characters and cannot start or end with a space. |
| 11. | Confirm the settings and click "Next". |
| 12. | Click "Finish" to exit the wizard. |
| 13. | The backup job and the status will be shown on the list. |
Button |
Name |
Description |
|
Start |
Start a backup job. |
|
Stop |
Stop a backup job. |
|
Edit |
Edit the backup job. |
|
View / Download |
View the job status and logs. Download the backup job logs. |
|
Delete |
Delete a backup job. This button is only available after a backup job is stopped. |
To disable a backup job's schedule, click "Edit" and select "Disabled" under "Settings" > "Schedule Type" and click "OK".
Default Backup Job Settings
| 1. | To edit the default backup job properties, click "Options". |
| 2. | Under "Event Logs" you can select to enable "Download Detailed Logs" and specify the maximum file size of the log file. Select to send an email alert when a backup job fails or completes. Note that the SMTP server settings must be properly set up in "System Settings" > "Notification". |
| 3. | Specify the backup policy in "Policy" and filter settings in "Filter". These will become the default settings for all the backup jobs. |
Download Backup Logs
| 1. | To download a backup job's logs, make sure the option "Download Detailed Logs" is enabled in "Options" > "Event Logs". |
| 2. | Click the "View / Download" button in "Action" column of a backup job. |
| 3. | Go to "Job Logs" and click "Download Logs". The log file can be opened by Microsoft Excel or any text editor. This button is only available after you have enabled "Download Detailed Logs" in "Options" > "Event Logs" and executed a backup job. |
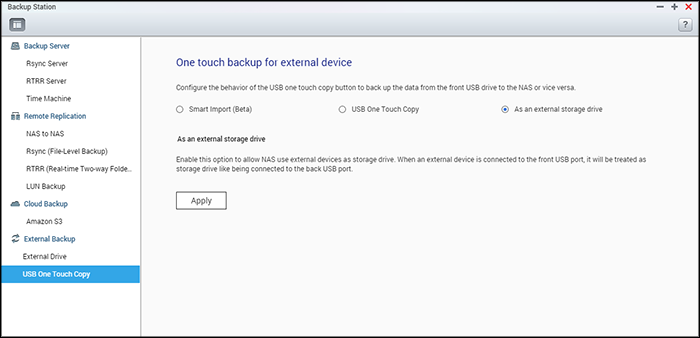
Enable the USB one touch copy button to back up data from USB storage connected to the front-panel USB port to the NAS or vice versa.
This feature is not supported by the TS-809U-RP, TS-879U-RP, TS-EC879U-RP, TS-1279U-RP, and TS-EC1279U-RP.
Smart Import (Beta)
When a USB device (such as a camera) is connected to the front USB port, all of the photos and videos on the device will be automatically imported to the NAS without pressing the "Copy" button. Imported files will be stored in "SmartImport," a newly-created folder, under the default backup directory. During each import, only new photos and videos will be imported to a new folder.
USB One Touch Copy
For customized backup configuration, please select "USB One Touch Copy."
| • | Backup direction: From the front USB drive to the NAS or vice versa. |
| • | Backup method: |
| o | Create directory: A new directory will be created on the destination and the source data will be copied to this directory. The new directory will be named as the backup date (YYYYMMDD). If there are two or more backups on the same day, the directory will be named with YYYYMMDD-1, YYYYMMDD-2... and so on. |
| o | Copy: Back up data to the destination share. If the same file exists, the destination file will be overwritten. |
| o | Synchronize: Back up data to the destination share and clear the redundant files. If the same file exists, the destination file will be overwritten. |
| • | Handle sparse files efficiently: A sparse file is a type of computer file that contains large blocks of zero-byte data. Turn on this option may reduce the time required for backup. |
| • | Source and destination folders: Specify the folder pairs for backup and click "Add". Maximum 9 folder pairs can be added. |
| • | Options: Click "Options" to set up notification of the backup jobs by email, SMS, or instant messaging (IM). |
| • | Unmount the front USB drive manually: When enabled, users can press the Copy button for about 8–10 seconds until the USB LED light turns off and remove the front USB drive from the NAS. |
| • | Enable the alarm buzzer: |
| o | One short beep: Backup has started. |
| o | Two short beeps: The front USB drive is being unmounted. |
Note: If there are multiple partitions on the source storage device, a new folder will be created for each partition on the destination as the backup folder. The backup folder will be named with the backup date and the partition number (YYYYMMDD-1 for partition 1, YYYYMMDD-2 for partition 2, etc). If the source storage device only contains one partition, the backup folder will be named YYYYMMDD. |
Data copy using front USB port
The NAS supports instant data copy backup from USB devices to the NAS or vice versa using the one touch copy button. To use this function, follow these steps:
| 1. | Make sure a hard drive is installed and formatted on the NAS. |
| 2. | Configure the behavior of the Copy button in "Backup Station" > "USB One Touch Copy". |
| 3. | Connect the USB device to the front USB port of the NAS. |
| 4. | Press the Copy button once. The data will be copied according to your settings. |
Note: Incremental backup is used for this feature. After the first data backup, the NAS only copies the files changed since the last backup. |
Caution: Files are copied from the source to the destination. Extra files in the destination will be deleted. Files with the same names will be overwritten by the source. Source data will remain unchanged. |
As an external storage drive
When an external device is connected to the front USB port, it will be identified as an external storage drive connected to the port.
|
© 2017 QNAP Systems, Inc. |
|