|
Using QTS Desktop |

|

|
|
|
|
Using QTS Desktop |

|

|
|
Using QTS Desktop
|
Using QTS Desktop |
|
|
|
|
|
Using QTS Desktop |
|
|
|
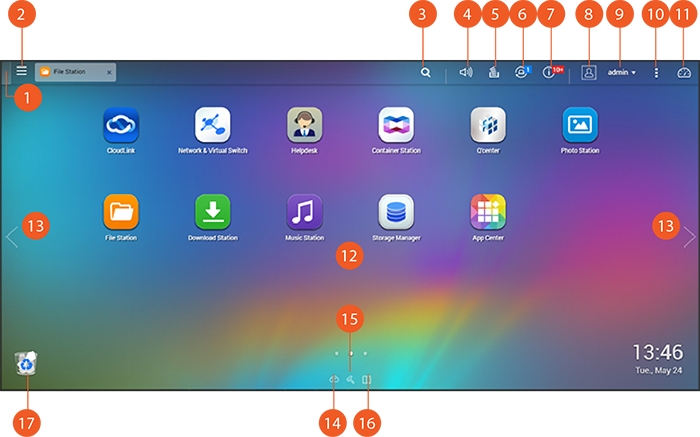
After you finish the basic setup and login to the NAS, the desktop will appear. Each main desktop feature is introduced in the following sections.
Topics covered in this chapter:
NO. |
Name |
Description |
||||||||||||||||||||||||||||||
1 |
Show Desktop |
Minimizes/restores all open windows. |
||||||||||||||||||||||||||||||
2 |
Main Menu |
Show the Main Menu. It includes three parts: 1) System features and settings (SYSTEMS): Key system features designed to manage or optimize your NAS; and 2) QNAP applications (APPLICATIONS): Applications developed by QNAP to enhance your NAS experience. Please note that the default Internet browser, instead of a window on the NAS Desktop, will be launched once you click a third-party application. Click the icon from the menu to launch the selected application. |
||||||||||||||||||||||||||||||
3 |
Search |
Enter a feature specific keyword in the search bar to search for the desired function and its corresponding online help. Click the result in the search bar to launch the function or open its online QTS help. |
||||||||||||||||||||||||||||||
4 |
Volume Control |
Adjust the volume of the line-out port and built-in speaker. You can also click "Audio Alert settings" to directly open the "Audio Alert" page in "Control Panel" > "System Settings" > "Hardware". Please note that the volume control feature is only available on NAS models with a line-out port and built-in speaker. |
||||||||||||||||||||||||||||||
5 |
Background Task |
Review and control (including pausing or postponing) all tasks running in the background (such as HDD SMART scanning, antivirus scanning, file backup or multimedia conversion.) |
||||||||||||||||||||||||||||||
6 |
External Device |
List all external storage devices and USB printers that are connected to the NAS via its USB or SATA ports. Click a listed device to open the File Station for that device. Click "Settings>>" to open the External Device page for relevant settings and operations (for details on File Station, refer to the File Station chapter.) Click the eject icon (up-arrow icon) to eject the external device. |
||||||||||||||||||||||||||||||
7 |
Notification and Alert |
Check for recent system error and warning notifications. Click "Clear All" to clear the list. To review all historical event notifications, click "Settings>>" to to open the System Logs. For details on System Logs, refer to the System Logs chapter. |
||||||||||||||||||||||||||||||
8 |
Options |
|
||||||||||||||||||||||||||||||
9 |
Admin Control |
Customize user-specific settings, change your user password, restart/shut down the NAS or log out your user account.
|
||||||||||||||||||||||||||||||
10 |
More |
|
||||||||||||||||||||||||||||||
11 |
Dashboard |
Check important NAS statistics, including system and HDD health, resources, storage usage, online users, scheduled tasks, etc. Click the header within each widget to open its respective page. |
||||||||||||||||||||||||||||||
12 |
Desktop Area |
Remove or arrange all applications on the desktop, or drag one application icon over the top of another to put them in the same folder. |
||||||||||||||||||||||||||||||
13 |
Next Desktop / Last Desktop |
Switch between desktops. |
||||||||||||||||||||||||||||||
14 |
myQNAPcloud |
Go to the myQNAPcloud website. |
||||||||||||||||||||||||||||||
15 |
QNAP Utility |
Check and download the latest and available NAS utilities. |
||||||||||||||||||||||||||||||
16 |
Feedback |
File a feature request and bug report. |
||||||||||||||||||||||||||||||
17 |
Network Recycle Bin |
All of the deleted items can be found in here. Right click on it to open the Network Recycle Bin, empty it (or permanently delete), or configure it (refer to the Network Recycle Bin chapter for details.) |
2-step Verification enhances the security of user accounts. Once enabled, you will need to enter a one-time security code (6 digits) in addition to your password whenever you sign in to the NAS. 2-step verification requires a mobile device with an authenticator app which supports the Time-based One-Time password (TOTP) protocol. Supported apps include Google Authenticator (Android/iPhone/BlackBerry) or Authenticator (Windows Phone.)
Start 2-step verification
| 1. | Install the authenticator App on your mobile device: For Android and iOS devices, install the Google Authenticator App from their respective App stores. For Windows Phone, install the Authenticator from its Store. |
| 2. | The system times of your mobile device and NAS must be synchronized. It is recommended to use the time provided from the Internet. |
| 3. | Go to "Options" > "2-step Verification" and click "Get Started". Complete the steps in the wizard to set up the NAS and your mobile device. |
| 4. | Configure your authenticator App by scanning the QR code or by entering the Secret Key into the App. |
| 5. | Enter the code generated from the app to the NAS to verify the correct configuration. |
| 6. | Select an alternative verification method by emailing you a security code or by answering a security question if you cannot use your mobile device. To email a security code, the SMTP server must be properly configured in "Control Panel" > "Notification" > "E-mail". |
Sign in QTS with 2-step verification
After your username and password are verified, you will be promoted to enter a security code. Enter the code currently provided from the authenticator app to sign in to QTS. If you cannot use your mobile device or your device is lost, you can select "Verify another way" to sign in with your chosen alternative verification method.
Stop 2-step verification
If you want to disable 2-step verification, go to "Options" > "2-step Verification" and click "Stop". Administrators can disable 2-step verification for other NAS account users if they are locked out by going to "Control Panel" > "Users" > "Edit Account Profile"
If an administrator cannot use a mobile device to sign in to QTS and no other administrators are available to disable 2-step verification for the locked-out administrator, the NAS must be restored to factory settings by physically pressing the "RESET" button on the NAS.
Tip:
|
Note:
|
|
© 2017 QNAP Systems, Inc. |
|