|
RAID Management |

|

|
|
|
|
RAID Management |

|

|
|
RAID Management
|
RAID Management |
|
|
|
|
|
RAID Management |
|
|
|
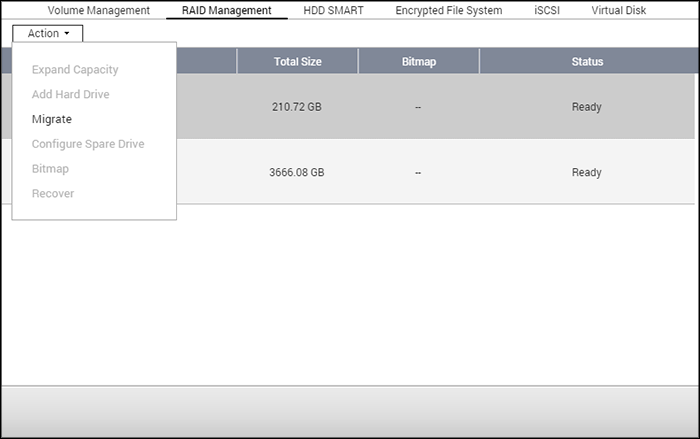
On this page, you can perform online RAID capacity expansion (RAID 1, 5, 6, 10) and online RAID level migration (single disk, RAID 1, 5, 10), add a hard drive member to a RAID 5, 6, or 10 configuration, configure a spare hard drive (RAID 5, 6, 10) with the data retained, enable Bitmap, recover a RAID configuration, and set a global spare.
To expand the storage capacity of a RAID 10 volume, you can perform online RAID capacity expansion or add an even number of hard disk drives to the volume.
Topics covered in this chapter:
Note: Online RAID capacity expansion, online RAID level migration, and RAID recovery are not supported by one-bay NAS models, the TS-210, and TS-212. |
Expanding Capacity (Online RAID Capacity Expansion)
Scenario
You bought three 250GB hard drives for initial setup of a TS-509 Pro NAS and configured RAID 5 disk configuration with the three hard drives.
A half year later, the data size of the department has largely increased to 1.5TB. In other words, the storage capacity of the NAS is running out of use. At the same time, the price of 1TB hard drives has dropped to a large extent.
Operation procedure
In "Storage Manager" > "RAID Management", select the disk volume for expansion and click "Action" > "Expand Capacity".
Click "Change" for the first hard drive to be replaced. Follow the instructions to proceed.
| 1. | When the description displays "Please remove this drive", remove the hard drive from the NAS. Wait for the NAS to beep twice after removing the hard drive. |
| 2. | When the description displays "Please insert the new drive", plug in the new hard drive to the drive slot. |
| 3. | After plugging in the hard drive, wait for the NAS to beep. The system will start rebuilding. |
| 4. | After rebuilding has completed, repeat the steps above to replace other hard drives. |
| 5. | After changing the hard drives and disk rebuilding has completed, click "Expand Capacity" to execute RAID capacity expansion. |
| 6. | Click "OK" to proceed. |
| 7. | The NAS beeps and starts to expand the capacity. |
Tip: After replacing the hard drive, the description field shows "You can replace this drive". This means you can replace the hard drive to a larger one or skip this step if the hard drives have been replaced already. |
Caution: When the hard drive synchronization is in process, Do NOT turn off the NAS or plug in or unplug the hard disk drives. |
The process may take from hours to tens of hours to finish depending on the drive size. Do NOT turn off the NAS during this process.
After RAID capacity expansion has finished, the new capacity is shown and the status is "Ready". You can start to use the NAS. (In the example you have 1.8TB logical volume.)
Tip: If the description still shows "You can replace this hard drive" and the status of the drive volume says "Ready", it means the RAID volume is still expandable. |
Note:
|
Online RAID Level Migration
During the initial setup of the TS-509 Pro, you bought a 250GB hard drive and configured it as a single disk. The TS-509 Pro is used as a file server for data sharing across departments. After six months an increasing amount of data is being saved on the TS-509 Pro. There are growing concerns regarding the hard drive capacity and health. Therefore, you planned to upgrade the disk configuration to RAID 5. You can install one hard drive for setting up the TS-509 Pro and upgrade the RAID level of the NAS with online RAID level migration in the future. The migration process can be done without turning off the NAS. All of the data will be retained.
You can do the following with online RAID level migration:
| • | Migrate the system from single disk to RAID 1, RAID 5, RAID 6 or RAID 10 |
| • | Migrate the system from RAID 1 to RAID 5, RAID 6 or RAID 10 |
| • | Migrate the system from RAID 5 with 3 hard drives to RAID 6 |
You need to:
| • | Prepare a hard drive of the same or larger capacity as an existing drive in the RAID configuration. |
| • | Execute RAID level migration (migrate the system from single disk mode to RAID 5 with 4 hard drives.) |
| 1. | Go to "Storage Manager" > "Volume Management". The current disk volume configuration displayed on the page is single disk (the capacity is 250GB.) |
| 2. | Plug in the new hard drives to drive slots 2 and 3 of NAS. The NAS will detect the new hard drives. The status of the new hard drives is "Unmounted". |
| 3. | Go to "Storage Manager" > "RAID Management", click "Action" > "Migrate". |
| 4. | Select one or more available drives and the migration method. The drive capacity after migration is shown. Click "Migrate". |
| 5. | Note that all the data on the selected hard drive will be cleared. Click "OK" to confirm. |
| 6. | When migration is in process, the required time and total drive capacity after migration are shown in the description field. |
| 7. | The NAS will enter "Read only" mode when migration is in process during 11%–49% to assure the data of the RAID configuration will be consistent after RAID migration completes. |
| 8. | After migration completes, the new drive configuration (RAID 5) is shown and the status is Ready. You can start to use the new drive configuration. |
The process may take from hours to tens of hours to finish depending on the hard drive size. You can connect to the web page of the NAS to check the status later.
Online RAID Capacity Expansion
Scenario
You had a tight schedule to set up a file server and an FTP server. However, you had only one 250GB hard drive. Therefore, you set up the TS-509 Pro with a single disk configuration. The original plan was to set up a 3TB RAID 5 network data center with the TS-509 Pro. You now plan to upgrade the disk configuration of the TS-509 Pro to RAID 5 and expand the total storage capacity to 3TB with all the original data retained after the hard drives are purchased. Using online RAID level migration to migrate the system from single disk to RAID 5 the total storage capacity will be 750GB (with one 250GB hard drive and three 1TB hard drives, the disk usage will be 250GB*4 for RAID 5.) You can refer to the previous step for the operation procedure.
Use online RAID capacity expansion to replace the 250GB hard drive with a new 1TB hard drive, and then expand the logical volume from 750GB to 3TB of RAID 5. You can refer to the previous step for the operation procedure.
Follow the steps below to add a hard drive member to a RAID 5 or RAID 6 disk configuration.
| 1. | Make sure the status of the RAID 5 or RAID 6 configuration is "Ready". |
| 2. | Install a hard drive on the NAS. If you have a hard drive which has already been formatted as single disk volume on the NAS, you can add this hard drive to the RAID 5 or RAID 6 configuration. It is recommended to use hard disk drives with the same capacity for the RAID configuration. |
| 3. | Select the RAID 5 or RAID 6 configuration on the "RAID Management" page and click "Add Hard Drive". |
| 4. | Select the new hard drive. The total drive capacity after adding the drive will be shown. Click "Add Hard Drive." |
| 5. | All the data on the new hard drive will be deleted during this process. The data on the original RAID 5 or RAID 6 configuration will be retained. Click "OK". The NAS will beep twice. |
To add hard drives to a RAID 10 disk volume, repeat the above steps. Note that you need to add an even number of hard disk drives to a RAID 10 volume. The storage capacity of the RAID 10 volume will increase upon successful configuration.
This process may take a few hours to tens of hours to complete depending on the number and the size of the hard drive. Do NOT turn off the NAS during this process. You can use a RAID configuration of larger capacity after the process.
You can add a spare drive to or remove a spare drive from a RAID 5, 6, or 10 configuration.
Follow these steps to use this feature.
| 1. | Make sure the status of the RAID 5, 6, 10 configuration is "Ready". |
| 2. | Install a hard drive in the NAS. If you have a hard drive which has already been formatted as single disk volume on the NAS, you can configure this hard drive as the spare drive. It is recommended to use hard disk drives with the same storage capacity for RAID configuration. |
| 3. | Select the RAID volume and click "Configure Spare Drive." |
| 4. | To add a spare drive to the selected configuration, select the hard drive and click "Configure Spare Drive." To remove a spare drive, unselect the spare drive and click "Configure Spare Drive." |
| 5. | All the data on the selected hard drive will be deleted. Click "OK" to proceed. |
The original data on the RAID 5, 6, or 10 disk volume will be retained. After the configuration completes, the status of the disk volume will become "Ready".
Note: A hot spare drive must be removed from the disk volume before executing the following action:
|
Bitmap improves the time for RAID rebuilding after an unexpected error, or removing or re-adding a hard drive from/to a RAID configuration. If an array has a bitmap, the member hard drive can be removed and re-added and only block changes since the removal (as recorded in the bitmap) will be re-synchronized. To use this feature, select a RAID volume and click "Action" > "Bitmap".
Note: Bitmap support is only available for RAID 1, 5, 6, and 10. |
RAID Recovery: If the NAS is configured as RAID 1, RAID 5, or RAID 6 hard drives are accidentally unplugged from the NAS, you can plug in the same hard drives into the same drive slots and click "Recover" to recover the volume status from "Not active" to "Degraded mode".
If the disk volume is configured as RAID 0 or JBOD and one or more of the hard drive members are disconnected or unplugged, you can plug in the same hard drives into the same drive slots and use this function to recover the volume status from "Not active" to "Normal". The disk volume can be used normally after successful recovery.
Disk volume |
Supports RAID recovery |
Maximum number of disk removal allowed |
Single |
No |
- |
JBOD |
Yes |
1 or more |
RAID 0 |
Yes |
1 or more |
RAID 1 |
Yes |
1 or 2 |
RAID 5 |
Yes |
2 or more |
RAID 6 |
Yes |
3 or more |
RAID 10 |
No |
- |
Note:
|
|
Standard RAID 5 |
QNAP RAID 5 |
Standard RAID 6 |
QNAP RAID 6 |
Degraded mode |
N-1 |
N-1 |
N-1 & N-2 |
N-1 & N-2 |
Read Only Protection (for immediate data backup & hard drive replacement) |
N/A |
N-1, bad blocks found in the surviving hard drives of the array. |
N/A |
N-2, bad blocks found in the surviving hard drives of the array. |
RAID Recovery (RAID Status: Not Active) |
N/A |
If re-plugging in all original hard drive to the NAS and they can be spun up, identified, accessed, and the hard drive superblock is not damaged. |
N/A |
If re- plugging in all original hard drives to the NAS and they can be spun up, identified, accessed, and the hard drive superblock is not damaged.) |
RAID Crash |
N-2 |
N-2 failed hard drives and any of the remaining hard drives cannot be spun up/identified/accessed. |
N-3 |
N-3 and any of the remaining hard drives cannot be spun up/identified/accessed. |
N = Number of hard disk drives in the array
Setting/Canceling Global Spare
A global spare drive replaces a failed hard drive in any RAID 1, 5, 6, 10 disk volumes on the NAS automatically. When the same global spare drive is shared by multiple RAID volumes on the NAS, the spare drive will replace the first failed drive in a RAID volume.
To set a disk drive as a global spare drive, select the single disk volume and click "Action" > "Set Global Spare". All the disk data will be cleared on the hard drive.
Note: The capacity of the global spare drive must be equal to or larger than that of a member drive of a RAID disk volume. |
To cancel a global spare drive, select the drive and click "Action" > "Cancel Spare Drive".
Further Information about RAID Management of the NAS
The NAS supports the following actions according to the number of hard disk drives and disk configurations supported. Refer to the following table for details.
Original Disk Configuration * No. of Hard Disk Drives |
No. of New Hard Disk Drives |
Action |
New Disk Configuration * No. of Hard Disk Drives |
RAID 5 * 3 |
1 |
Add hard drive member |
RAID 5 * 4 |
RAID 5 * 3 |
2 |
Add hard drive member |
RAID 5 * 5 |
RAID 5 * 3 |
3 |
Add hard drive member |
RAID 5 * 6 |
RAID 5 * 3 |
4 |
Add hard drive member |
RAID 5 * 7 |
RAID 5 * 3 |
5 |
Add hard drive member |
RAID 5 * 8 |
RAID 5 * 4 |
1 |
Add hard drive member |
RAID 5 * 5 |
RAID 5 * 4 |
2 |
Add hard drive member |
RAID 5 * 6 |
RAID 5 * 4 |
3 |
Add hard drive member |
RAID 5 * 7 |
RAID 5 * 4 |
4 |
Add hard drive member |
RAID 5 * 8 |
RAID 5 * 5 |
1 |
Add hard drive member |
RAID 5 * 6 |
RAID 5 * 5 |
2 |
Add hard drive member |
RAID 5 * 7 |
RAID 5 * 5 |
3 |
Add hard drive member |
RAID 5 * 8 |
RAID 5 * 6 |
1 |
Add hard drive member |
RAID 5 * 7 |
RAID 5 * 6 |
2 |
Add hard drive member |
RAID 5 * 8 |
RAID 5 * 7 |
1 |
Add hard drive member |
RAID 5 * 8 |
RAID 6 * 4 |
1 |
Add hard drive member |
RAID 6 * 5 |
RAID 6 * 4 |
2 |
Add hard drive member |
RAID 6 * 6 |
RAID 6 * 4 |
3 |
Add hard drive member |
RAID 6 * 7 |
RAID 6 * 4 |
4 |
Add hard drive member |
RAID 6 * 8 |
RAID 6 * 5 |
1 |
Add hard drive member |
RAID 6 * 6 |
RAID 6 * 5 |
2 |
Add hard drive member |
RAID 6 * 7 |
RAID 6 * 5 |
3 |
Add hard drive member |
RAID 6 * 8 |
RAID 6 * 6 |
1 |
Add hard drive member |
RAID 6 * 7 |
RAID 6 * 6 |
2 |
Add hard drive member |
RAID 6 * 8 |
RAID 6 * 7 |
1 |
Add hard drive member |
RAID 6 * 8 |
RAID 10 * 4 |
2 |
Add hard drive member |
RAID 10 * 6 |
RAID 10 * 4 |
4 |
Add hard drive member |
RAID 10 * 8 |
RAID 10 * 6 |
2 |
Add hard drive member |
RAID 10 * 8 |
RAID 1 * 2 |
1 |
Online RAID capacity expansion |
RAID 1 * 2 |
RAID 5 * 3 |
1 |
Online RAID capacity expansion |
RAID 5 * 3 |
RAID 5 * 4 |
1 |
Online RAID capacity expansion |
RAID 5 * 4 |
RAID 5 * 5 |
1 |
Online RAID capacity expansion |
RAID 5 * 5 |
RAID 5 * 6 |
1 |
Online RAID capacity expansion |
RAID 5 * 6 |
RAID 5 * 7 |
1 |
Online RAID capacity expansion |
RAID 5 * 7 |
RAID 5 * 8 |
1 |
Online RAID capacity expansion |
RAID 5 * 8 |
RAID 6 * 4 |
1 |
Online RAID capacity expansion |
RAID 6 * 4 |
RAID 6 * 5 |
1 |
Online RAID capacity expansion |
RAID 6 * 5 |
RAID 6 * 6 |
1 |
Online RAID capacity expansion |
RAID 6 * 6 |
RAID 6 * 7 |
1 |
Online RAID capacity expansion |
RAID 6 * 7 |
RAID 6 * 8 |
1 |
Online RAID capacity expansion |
RAID 6 * 8 |
RAID 10 * 4 |
1 |
Online RAID capacity expansion |
RAID 10 * 4 |
RAID 10 * 6 |
1 |
Online RAID capacity expansion |
RAID 10 * 6 |
RAID 10 * 8 |
1 |
Online RAID capacity expansion |
RAID 10 * 8 |
Single * 1 |
1 |
Online RAID level migration |
RAID 1 * 2 |
Single * 1 |
2 |
Online RAID level migration |
RAID 5 * 3 |
Single * 1 |
3 |
Online RAID level migration |
RAID 5 * 4 |
Single * 1 |
4 |
Online RAID level migration |
RAID 5 * 5 |
Single * 1 |
5 |
Online RAID level migration |
RAID 5 * 6 |
Single * 1 |
6 |
Online RAID level migration |
RAID 5 * 7 |
Single * 1 |
7 |
Online RAID level migration |
RAID 5 * 8 |
Single * 1 |
3 |
Online RAID level migration |
RAID 6 * 4 |
Single * 1 |
4 |
Online RAID level migration |
RAID 6 * 5 |
Single * 1 |
5 |
Online RAID level migration |
RAID 6 * 6 |
Single * 1 |
6 |
Online RAID level migration |
RAID 6 * 7 |
Single * 1 |
7 |
Online RAID level migration |
RAID 6 * 8 |
Single * 1 |
3 |
Online RAID level migration |
RAID 10 * 4 |
Single * 1 |
5 |
Online RAID level migration |
RAID 10 * 6 |
Single * 1 |
7 |
Online RAID level migration |
RAID 10 * 8 |
RAID 1 * 2 |
1 |
Online RAID level migration |
RAID 5 * 3 |
RAID 1 * 2 |
2 |
Online RAID level migration |
RAID 5 * 4 |
RAID 1 * 2 |
3 |
Online RAID level migration |
RAID 5 * 5 |
RAID 1 * 2 |
4 |
Online RAID level migration |
RAID 5 * 6 |
RAID 1 * 2 |
5 |
Online RAID level migration |
RAID 5 * 7 |
RAID 1 * 2 |
6 |
Online RAID level migration |
RAID 5 * 8 |
RAID 1 * 2 |
2 |
Online RAID level migration |
RAID 6 * 4 |
RAID 1 * 2 |
3 |
Online RAID level migration |
RAID 6 * 5 |
RAID 1 * 2 |
4 |
Online RAID level migration |
RAID 6 * 6 |
RAID 1 * 2 |
5 |
Online RAID level migration |
RAID 6 * 7 |
RAID 1 * 2 |
6 |
Online RAID level migration |
RAID 6 * 8 |
RAID 1 * 2 |
2 |
Online RAID level migration |
RAID 10 * 4 |
RAID 1 * 2 |
4 |
Online RAID level migration |
RAID 10 * 6 |
RAID 1 * 2 |
6 |
Online RAID level migration |
RAID 10 * 8 |
RAID 5 * 3 |
1 |
Online RAID level migration |
RAID 6 * 4 |
RAID 5 * 3 |
2 |
Online RAID level migration |
RAID 6 * 5 |
RAID 5 * 3 |
3 |
Online RAID level migration |
RAID 6 * 6 |
RAID 5 * 3 |
4 |
Online RAID level migration |
RAID 6 * 7 |
RAID 5 * 3 |
5 |
Online RAID level migration |
RAID 6 * 8 |
|
© 2017 QNAP Systems, Inc. |
|